Connect ChatAgentLab to WooCommerce
This guide will walk you through how to connect an AI agent from ChatAgentLab to your WooCommerce store. It enables the agent to retrieve live inventory and order status data based on user input, such as a product name or customer email address.
<div style="padding: 1em; background-color: #1e1e1e; border-left: 4px solid #3b82f6; font-style: italic; color: #ccc;">
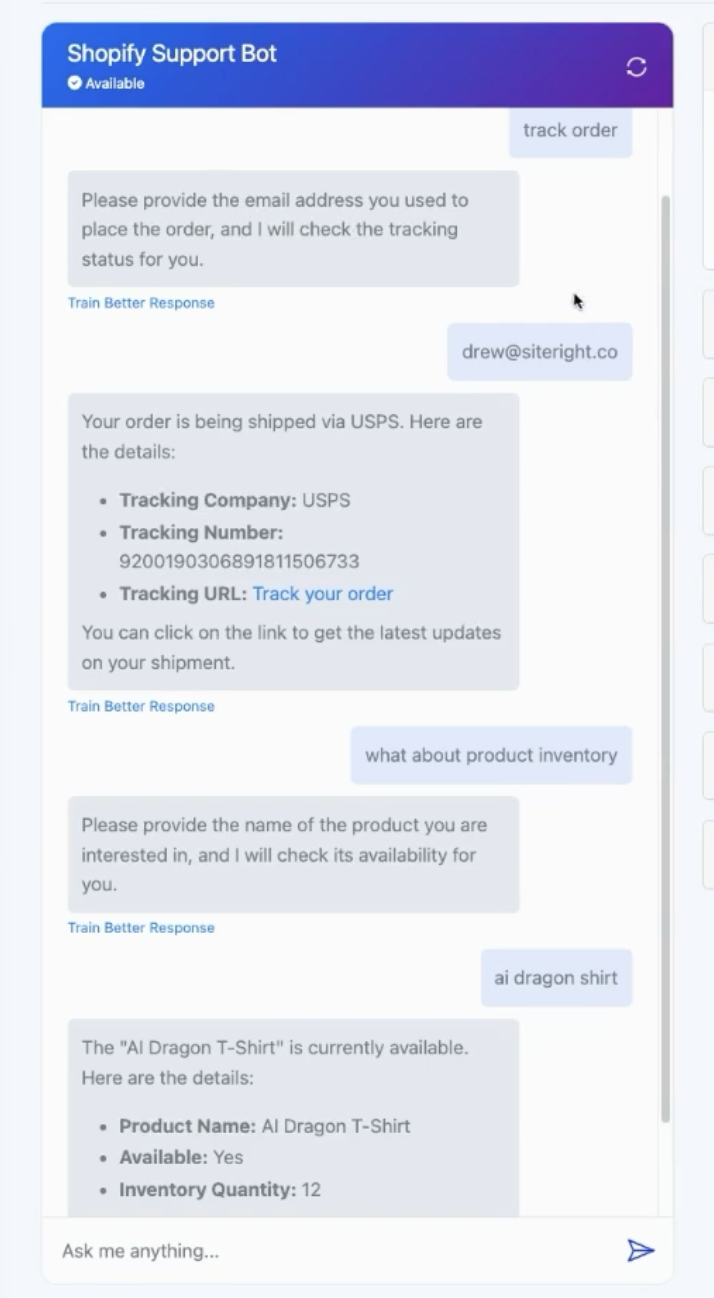
This allows your AI agent to respond in real-time with product availability or order details pulled directly from your WooCommerce store.
</div>
🔧 What You Need Before You Start
- A WooCommerce store with API access enabled
- API credentials (Consumer Key and Secret)
- A published AI agent in ChatAgentLab
- A Replit account (free)
- ReqBin.com for testing your API
Step 1: Enable the WooCommerce REST API
- Go to your WordPress dashboard → WooCommerce > Settings
- Click the Advanced tab → REST API
- Click Add key
- Name it something like
ChatAgentLab Integration - Select your admin user, and set permissions to Read
- Copy the Consumer Key and Consumer Secret (you'll need these in your code)
Step 2: Generate Code Using ChatGPT
<div style="padding: 1em; background-color: #1e1e1e; border-left: 4px solid #3b82f6; font-style: italic; color: #ccc;">
<strong>Which prompt should I use?</strong><br>
Use the <strong>WooCommerce Prompt</strong> below if you're following this guide step-by-step.<br>
Use the <strong>Advanced Prompt Template</strong> if you're integrating a different API or want more customization.
</div>
🔸 WooCommerce Prompt
Write a Flask app that connects to the WooCommerce REST API using consumer_key and consumer_secret. It should return product availability based on product name, and also return order status based on customer email address. Provide full code and JSON parameter schema.💡 Advanced Prompt (Template)
I want to create a custom function for my AI agent that retrieves information based on user input.
The function should be able to accept a {input_type} and return the corresponding {output_type} using the {API_name}.
The function should be implemented as a Flask web application.

Here are the details:

1. The function name should be `{function_name}`.
2. It should use the {API_name} to fetch the {output_type}.
3. The Flask app should have an endpoint `/get_{output_type}` that accepts a POST request with a JSON body containing the {input_type}.
4. The API response should be parsed to extract the relevant {output_type} information.
5. If there are any errors (HTTP errors, network errors, or invalid input), they should be handled gracefully and return appropriate error messages.
6. The JSON parameters for the custom function interface should be provided.

Please provide the complete code for the Flask app, and also the JSON parameters for the custom function interface.

Example:

I want to create a custom function for my AI agent that retrieves information based on user input. The function should be able to accept a city name and return the corresponding current weather using the WeatherAPI. The function should be implemented as a Flask web application.

Here are the details:

1. The function name should be `getWeather`.
2. It should use the WeatherAPI to fetch the current weather.
3. The Flask app should have an endpoint `/get_weather` that accepts a POST request with a JSON body containing the city name.
4. The API response should be parsed to extract the relevant weather information.
5. If there are any errors (HTTP errors, network errors, or invalid input), they should be handled gracefully and return appropriate error messages.
6. The JSON parameters for the custom function interface should be provided.

Provide the complete code for the Flask app.
Provide the JSON parameters for the custom function interface.
Provide the name of the function.
Provide the short description of the function.
Provide the info to test in reqbin.
The API keys should be stored as variables.
Step 3: Host the Code with Replit
- Create a new Python project in Replit
- Paste in the Flask code generated from ChatGPT
- Add your credentials as Secrets:
WC_KEY= Your Consumer KeyWC_SECRET= Your Consumer Secret
- Run the project to test
- Click Deploy, then copy the public URL Replit gives you (e.g.
https://shop-agent.username.repl.co)
<div style="padding: 1em; background-color: #1e1e1e; border-left: 4px solid #facc15; font-style: italic; color: #eee;">
⚠️ Replit will generate a public URL like:<br>
<code>https://your-project-name.username.repl.co</code><br><br>
You can find this after running or deploying your project inside Replit.
</div>
Step 4: Test the Function Using ReqBin
- Go to Reqbin.com
- Set the method to POST
- Use your deployed Replit URL
- Test product inventory with:
{
  "product_name": "AI Dragon T-Shirt"
}- Test order tracking with:
{
  "email": "customer@example.com"
}- Confirm the response includes relevant inventory or order data
Step 5: Connect to ChatAgentLab
- Open your AI agent in ChatAgentLab and go to the Labs tab
- Click New Function > Custom Function
- Fill in the fields for product availability:
Alias: get_wc_product_availability
URL: Paste in the Replit URL
Description: Returns WooCommerce product inventory based on name
Parameters:
{
  "type": "object",
  "properties": {
    "product_name": {
      "type": "string",
      "description": "Name of the product to check inventory"
    }
  },
  "required": ["product_name"]
}
🔷 Add a Second Function for Order Tracking
Repeat the same steps to create a second function, this time for tracking orders based on customer email.
Alias: get_wc_order_status
Description: Returns most recent order status by email
Parameters:
{
  "type": "object",
  "properties": {
    "email": {
      "type": "string",
      "description": "Customer email address"
    }
  },
  "required": ["email"]
}
Step 6: Update the Agent's Prompt Logic
Add this to your system prompt:
If the user asks about product availability, use `get_wc_product_availability`.
If they ask about an order, use `get_wc_order_status`.
<div style="padding: 1em; background-color: #1e1e1e; border-left: 4px solid #3b82f6; font-style: italic; color: #ccc;">
You don’t need to manually copy any code here. Simply use one of the prompts above to generate the full Flask code dynamically with ChatGPT. This ensures your function stays adaptable to future needs.
</div>
🚀 Ready to Go Live!
Your WooCommerce-connected AI agent is ready for action — answering stock questions and tracking orders in real time.
Need help? Reach out through ChatAgentLab’s support center.